Thursday, January 28, 2010

10 Kid Made Valentine Ideas

I am not exactly sure where January went, but I do know that it is almost gone. Soon I will turn around and it will be Valentines Day, and the kids will need Valentines to share with their friends.

They always enjoy creating the Valentines that will be given. It doesn't have to be anything complicated. A couple years back, we simply cut out hearts from construction paper and used doilies to decorate them. Then the kids wrote a message on the back. Simple and fun.

I'm not sure what we will be doing this year. While I am gathering ideas, I thought I'd share a few of them with you.


Patchwork Heart (There are several ideas on this site. Scroll down for this one.)


Will you be making Valentines this year? Please share your ideas.

Tuesday, January 26, 2010

Carnival #152

Take a trip down under for an Australian Holiday. Today's carnival is at Frill in the Hills, hosted by Liss who is celebrating Australia Day today.

Here are some of my favorites this week:

Reuse and Save: Plastic Bags
Some great ideas to a get a little more use out of those plastic shopping bags.

Bread Bags Upcyled into Drink Coaster
Speaking of using plastic bags, here is one from the queen of reusing them. These drink coasters are really cute!

Homemade Hostess Cupcakes
.
Yummy! And really not much more work than your average cupcake.

Thanks for joining us this week! Be sure to check the entire carnival at Frills in the Hills.

Monday, January 25, 2010

Crowd Pleasin Chili


Chili is one of those go to recipes I use on cold days or when I need to feed a crowd. Chili is also a great dish to serve on game day. It's versatile and goes with lots of other different dishes. Serve it over hot dogs. Top it with cheese and crunchy tortilla strips. Wrap it in a soft tortilla shell with some sour cream. Make it spicy or sweet. Meatless or with different meaty combos. Chunky or saucy. Canned tomatoes and red kidney beans make it so much easier and FASTER to make chili.

Here's how I make mine. It's chunky, meaty and makes enough to feed a small army.

Ingredients
3 cans diced tomatoes any brand
1 pound ground beef browned & drained
1/2 pound other ground meat browned & drained
2 cans light red kidney beans drained and rinsed well
1 onion diced
2 green bell peppers chopped
2 red or orange bell peppers chopped
salt, pepper & other spices

Directions
In a large pot, combine meat, onions, peppers and a dash of salt over medium heat to lightly sautee. Once veggies start to loosen up a little, add the diced tomatoes with juices. Allow to cook over medium heat for approximately 20 minutes. Reduce heat, add kidney beans, one can of water plus salt, pepper, and spices and simmer another 15 minutes.

Chili Cooking Tips
  • The amount of salt and spice will vary depending on the flavor and type of tomatoes, meats, and beans you use in the recipe. Home canned beans and tomatoes will have a distinctly different taste than mass produced canned goods from the store. Using spicy sausage instead of ground turkey will add a different flavor too.
  • Taste the chili once you've added all your ingredients - minus any spices. Slowly add spices, one by one, mixing well with the chili and tasting after each to get a sense of how each spice affects the dish.
  • Start with lower amounts of hot spices like red pepper flakes, paprika, and cayenne. Once the chili simmers, it opens up those spices so the flavor increases as it simmers.
  • If you end up with chili way to spicy to eat. Try draining some of the liquid and adding plain hot water till it's diluted to a reasonable "heat" level.

Click here for a printable version of this recipe.
Jenn also blogs about crafts, food, and family life at Frugal Front Porch.

Friday, January 22, 2010

Homemade Peanut Butter Cups (Allergy-Friendly!)

Kellie is a tree-hugging mom to three who's learning to cook from scratch. She blogs regularly at Greenhab: The Browns Go Green and the Green Phone Booth.


I never stopped to think about how peanut butter is made, or what's in it, until last week when we realized that our 4 year old might have some food allergies. Luckily he's not allergic to nuts, but we have taken him off milk and we're thinking about gluten as well. It's gotten me reading the labels on absolutely EVERYthing and thinking about GFCF treats I can make for him.

This week I decided to try my hand and making peanut butter since it seems to be a staple in our house. I can safely say that I will never buy peanut butter from a store again! It was SO quick and easy.


I bought about a pound of dry roasted peanuts from the bulk bin at the grocery store, although I only used about 1.5 cups in this first batch. All I did was throw the peanuts into the food processor, drizzle a tiny bit (maybe a tablespoon) of peanut oil on top and blend for a few minutes until it was creamy. You can adjust the amount of oil depending on how thick or thin you like your peanut butter.

While I was feeling all domestic, I decided to make some peanut butter cups too.

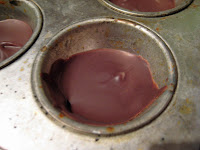
The pan I used is like a mini muffin pan, but the cups are not as deep. I don't know what it's really for (so much for pretending to be domestic!) but it was perfect for this project.

I simply melted some gluten and casein free chocolate chips (you could use regular of course) and put a dab in the bottom of these mini muffin cups. I put it in the freezer for a few minutes to let the chocolate harden a bit so that the peanut butter would sit nicely on top when I added it. I topped it off with more chocolate and threw it back in the freezer for a while.

Most of them popped right out like muffins would, but I did have to extract a few with a knife. The only thing I'd do differently next time would be to keep the peanut butter to the middle, so that the chocolate drips down the sides and completely encases the peanut butter.

So there you have a gluten free, casein free treat...and we have a good amount of peanut butter left over for the peanut butter and jelly granola bars I'm planning to try over the weekend.

Thursday, January 21, 2010

Blackened Pork Chops


Blackened meat is one of my favorites. I love the spiciness of meat prepared in this manner. I love how the meat stays so juicy and tender after being cooked hot and fast in a cast iron skillet. I love that blackening meat really is a simple cooking skill that produces impressive results.

To blacken meat you simply rub a mixture of spices on the meat, and then cook it in a hot skillet. The technique works well with about any meat, but is especially good for chicken or pork. The spice mixture is very flexible and can be varied according to what you have on hand, and the spiciness can easily be adjusted to suit your family's taste.

One warning. Cooking with this method will produce smoke in your kitchen. This smoke may cause one of your children to accuse you of ruining dinner, and to inform the rest of the family that dinner is burned. Said hypothetical child will also ask for seconds and thirds of this ruined dinner. Not that this has ever happened in my house. (ahem)

Blackened Pork Chops

A great recipe to spice up the family dinner.

See Blackened Pork Chops on Key Ingredient.


Stephanie is a homeschooling, homesteading momma of four, attempting to live a frugal and simple life in the hills of West Virginia. She also blogs at Stop the Ride and Adventures in the 100 Acre Woods.

Tuesday, January 19, 2010

Carnival #151

Welcome to this week's edition of the Make it from Scratch carnival.

cooking

MomToCherubs presents What's For Breakfast ? posted at Simply Beck's Bounty.

Abi presents Pretzel Fun posted at lighter side.

NerdMom presents Coconut Pecan Cookies posted at Nerd Family Food.

Kristen presents Homemade Ravioli: Make Your Own Monday #2 posted at Frugal Antics of a Harried Homemaker, saying, "Though making your own ravioli is time consuming, it's so delicious and frugal. You can make a ton and freeze them for future use."

Kathy Hester (GeekyPoet) presents Slow Cooker Meatless Sausage Mushroom Ragu posted at Healthy Slow Cooking.

Gracyqueen presents I Can’t Has Cheezburger (Infographic) posted at Match A College.com.

Kristia presents How To Roast A Chicken posted at Family Balance Sheet.

Annette Berlin presents Red Bean Soup posted at Craft Stew, saying, "This very healthy and tasty Red Bean Soup is my variation on Nava Atlas’ recipe in Great American Vegetarian."

Chris Mathew presents Types Of Truffles posted at How To Grow Mushrooms, saying, "Learn how to grow mushrooms and identify different types of truffles. See which ones are the valuables ones and the not to sweet ones."

Mary@SimplyForties presents Pasta and Eggs posted at SimplyForties.

Amy Joines presents 80 Great sites for those who love to Bake posted at MRI Technician Training.

knitting. crafts. other

The Handyguys presents Episode #23 Handyguys Trellis plans posted at The Handyguys Podcast, saying, "This is sort of a craft. Build your own trellis from one piece of wood. If it takes you a while to make things start now so you will have it ready for spring."

Pamela Jorrick presents The BEST Birthday Party Ever!!! posted at Blah, Blah, Blog.

Devildogwife presents Love, Grace, Child... Baptism Necklace posted at Marine Corps Nomads, saying, "I created this personalized necklace for my daughter's baptism."

Dana presents Peek inside my first handmade journal posted at Roscommon Acres.

June Tree presents YNAB (You Need A Budget) Personal Budget Software Is 10% Off posted at The Digerati Life, saying, "Do your own budget with YNAB. Manage your own money!"

TSW Blog presents Family Budget For Frugal Living: Living Cheap Can Be Fun, Too! posted at The Smarter Wallet, saying, "Be self sufficient and save money."

That concludes this edition. Submit your blog article to the next edition of make it from scratch!using ourcarnival submission form. Next week's host is Frills in the Hills. Hope to see you there.


Apologies for the late, and short and sweet edition today. Hope you enjoy this week's submissions.

Sunday, January 17, 2010

Fluffy Chocolate Chip Pancakes

I have always had trouble getting light fluffy thick pancakes like the yummy goodies you get from places like IHOP. They are so light and melt-in-your-mouth good. I tried experimenting with a new recipe last week and I think I've discovered the secret!

The secret, it seems, is eggs! I add one egg to my batter and keep the batter a little thicker than I'm accustomed to making and WHA-LA - light, fluffy, and thick pancakes.

Here's my easy homemade chocolate chip pancake recipe but be warned, this makes a large batch so freeze your extras!!!

Ingredients
2 c Self Rising Flour
2/3 c granulated sugar
4 oversized tbs shortening or butter (I used butter flavored Crisco)
1 tsp vanilla extract
1 egg
1 to 2 c 2% milk (start with 1 cup & gradually work up till you get the consistency you need)
1 bag of chocolate chips

Directions
Wisk your dry ingredients together. Cut in the shortening. Make a small well in the flour then add the vanilla extract, egg and bit of milk. Wisk together the wet ingredients to scramble the egg. Mix with the rest of the dry ingredients gradually adding more milk till you get the consistency of melted cheese or something like cake batter. Mix in chocolate chips. Cook over medium heat for several minutes till the outsides are set and you see bubbles form in the middle of the pancake. Flip and cook for up to two more minutes.


Pancake batter tips

  • Start with less milk than what you think it will take and if the first pancake turns out too thick, add more water or milk to thin.
  • If you batter is a little too thin, mix in additional flour.
  • If the batter is a lot too thin, mix a tablespoon or more of instant vanilla pudding mix and let it rest for a few minutes. It will thicken the batter without weakening the overall flavor of the pancake batter.

What's your best pancake secret????

Jenn also blogs about cooking, crafting, and raising kids on a family friendly budget at Frugal Front Porch.

Thursday, January 14, 2010

Build a Snowman Kit

My husband's grandmother is a very talented woman. She blesses her family with the many beautiful creations that she makes. She made my wedding dress. She crochets blankets for newly married couples and newborn babies. And most every Christmas a homemade cutie is included among our presents.

Over the years she has made and given us quite the collection of winter decorations. There have been a reindeer, dogs, frogs, santas, gingerbread people, and a wide variety of snow people, some of which are pictured above. This year she gave the kids a little something different; a build a snowman kit.

The snowman kit includes everything you need to build a snowman, except for the snow. There is a hat, eyes, nose, mouth, buttons, scarf, a corn cob pipe, and even arms with mittens.

The hat and mittens are sewn out of vinyl. The mittens are stuffed with pillow stuffing and attached to sticks (arms.) The hat has a V of hanger wire attached at the back. This is for keeping the hat attached to the snowman.


The buttons, eyes, and nose were made by gluing different sized wooden balls unto dowel rods, and then painting. The pipe is a bit of corncob glued to a dowel rod.


A fleece scarf was provided as were flat stones to make the mouth with. And here is the completed snowman. Apologies for the very poor picture quality. I only had my phone with me at the time. Can you tell my phone is practically an antique?


The kids had a lot of fun building their snowman, and dressing him. We are so blessed to have such an incredibly crafty grandma in the family who loves to share her creative talents with us!

Tuesday, January 12, 2010

Carnival #150

This week the Make it from Scratch carnival can be found at Gotta Little Space. There are a wide array of submissions this week. Here are some of my favorites:

Homemade Poptarts
Picking this one at the risk of having my family pester me for weeks because I still have not tried to make them. They look so good.

Pick A Free Bag Pattern
Craft Stew always compiles such wonderful lists for us Make it from Scratchers.

Make your Own Shampoo
Not sure I'd actually make this, but then again why not?

Thanks for joining us this week. Be sure to check out the entire carnival at Gotta Little Space.

Monday, January 11, 2010

Minature Stuffed Pepper Boats

Here's a crowd pleasing appetizer that's perfectly portioned to keep it healthy while tantilizing your taste buds. Don't have a big party planned? Freeze the stuffing mixture, reheat to stuff and eat later.

Ingredients
2 medium apples - peeled & diced bitesize pieces
1 lb of ground beef, turkey, or sausage - cooked, crumbled
2 c dried berry fruit - raisins, cranberries, cherries, etc
1 1/2 c finely chopped walnuts
1 c herb flavored bread crumbs
1/2 c pure apple juice or water
30 miniature sweet bell peppers - various colors
shredded cheese - mozzarella, parmesean, cheddar, etc - optional

Create the stuffing
Preheat oven to 350 and grease a casserole dish with Extra Virgin Olive Oil. Over medium heat in a fry pan, combine all ingredients except peppers and cheese till warmed through.

Assemble the pepper boat
Slice enough of one side of the minature peppers skin to expose the seeds. Remove and discard the seeds. Spoon stuffing mixture into the pepper “boat” and top with a bit of cheese. Bake approximately 15 minutes or until cheese is melted and slightly toasted.

Enjoy

*Jenn also blogs about food, crafts, and raising kids on budget at Frugal Front Porch*

Thursday, January 7, 2010

Making a Clothespin Holder from an Old Jersey

It is twenty degrees out. The forecast is calling for around 8 inches of snow. Instead of crying, I am dealing with this arctic weather by thinking about spring.

I love my clothes line. I love the smell of clothes fresh from the line. I love the extra absorbency the sunshine seems to add to my towels, not too mention the stains it takes out of our clothes. I love the quiet time in the sun I find while hanging the clothes. The fact that the drying my clothes on the line saves me money is an added bonus.

Most years I use my clothes line year round. This winter has been a harsh one already, and my clothes line has not seen much use. Back in November, before all this winter weather set in, I made myself a new clothes pin bag to use when (and if) this winter weather breaks.

I've tried a lot of different clothes pin bags over the years. First I bought one from the store. That was a big disappointment. I didn't have it long before it broke. For awhile I used a make do holder using plastic shopping bags. Then I got a wonderful bag from My Recycled Bags. You may recognize this site, as Cindy is a frequent Make it from Scratch participant. Her clothes pin bag is made from crocheted recycled plastic bags. I loved this bag, but after two years of heavy use I wore it out. It was time for a new bag.

This time I wanted to try and make my own. I don't crochet, so making one like Cindy's was not an option. I needed to sew one. I did some searching around and the idea I like best involved a button up denim shirt that was sewn at the bottom to create a bag for the pins. You can see it here.

I like the simplicity of the bag, and was pretty set on making one like it. After some thought though, I realized that it might not be exactly what I wanted. One of the things I liked best about Cindy's bag was that it was mesh. See, I've been known, every once in awhile, to not quite get the clothes in when it rains. Occasionally, mostly when the kids are helping, the clothes make it in, but the pins are left in the bag hanging on the line. With the mesh bag the clothes pins dried out nicely. I didn't think that would work so well with a button up shirt.

After a little thought, I remembered an old practice jersey that my oldest son had. The perfect material for my clothes pin bag.

First I sewed the bottom together, and clipped the inside corners of the seam so that it would not pucker.


Then, I sewed the arm holes shut. This probably wasn't really necessary, but it seemed like it should be done.


The original neck hole was not large enough to allow me to reach down into the bag to get the pins. I enlarged it by cutting the front of the neck out in a rectangle and sewing up the edges.


Finally, I hung the bag on a clothes hanger. I suggest using a mostly plastic hanger, and one that swivels. Being able to turn the bag around on the line makes for easier work while hanging your clothes.

And in case you're wondering the picture above was taken in November. Currently my back yard looks like this.


Stephanie is a homeschooling, homesteading momma of four, attempting to live a frugal and simple life in the hills of West Virginia. She also blogs at Stop the Ride and Adventures in the 100 Acre Woods.


Tuesday, January 5, 2010

Carnival #149

The first carnival of 2010 can be found at Out of Debt Again. Thanks to Mrs. Accountability for hosting this week's edition of Make it from Scratch. Here are some of my favorites!

It's Sew Easy to Save
This is is wonderful for those, like myself, who are just beginning to sew. Included are suggestions for easy and basic projects, and links to free patterns.

Make Your Own Sauerkraut
I canned some cabbage this fall including some easy sauerkraut. This article is about making fermented sauerkraut, something I have not tried yet.

Homemade Cough Medicine
'Tis the season for colds and flu. Learning about home remedies is on my to do list.

Be sure to check out the entire carnival! Hope to see your post included next week!

Monday, January 4, 2010

Guilt Free Au Gratin

With the New Year under way, I've made a resolution to embrace a healthier lifestyle this year. This will be a difficult transition for my family who's southern upbringing is firmly rooted in fried foods filled with either butter or sugar. We love rich flavors and comfort style foods. To avoid mutiny in the house, I've decided to discreetly and covertly make the transition to a healthier lifestyle. I am on the hunt for healthier versions of the foods we already eat. Simply strategies and recipe alterations to reduce the fat and calories we consume while maintaining great flavor. Slowly, one dish at a time, the conversion will occur.

We love Au Gratin potatoes. The creamy sauce, the ooey gooey cheese, the starchy potatoes. What's NOT to love. Earlier this week, I took the plunge and make a few alterations to one of our favorite dishes. No one was the wiser so this resolution may very well stick - but not to our waistline!

Making a healthy Au Gratin style dish is easier than you might think. Here are a few basic strategies to a full flavor Au Gratin that's friendly to your waistline!

  1. Substituting 2% milk for the cream cuts tons of fat and doesn't affect the flavor.
  2. Want a calcium boost. Mix in some powdered milk.
  3. Use margarine in place of butter to further reduce fat and calories.
  4. To increase flavor, use garlic, onions, peppers, and other flavorful spices in the rue.
  5. Cheese is also a large source of fat and in many recipes the second largest ingredient. Using full flavor cheese like cheddars and parmesean allows you to use less cheese while maintaining great flavor. Using reduced fat cheese is also a great way to lower the fat content in your Au Gratin. Cheeses like mozzarella, farmer's cheese, and goat cheese are naturally lower in fat and calories.

I adapted the Au Gratin Cauliflower recipe in the recent Taste of Home Healthy Cooking magazine by using half frozen cauliflower and the other half diced potatoes. It's yummy and better for me than my normal recipe!

Guilt Free Au Gratin
Ingredients
  • 3 tbs butter or margarine
  • 3 tbs flour
  • 1 tsp salt
  • 2 tbs garlic
  • 3 tbs minced onion
  • 1 tsp paprika
  • 2 cups 2% milk
  • 1/2 cup reduced fat mozzarella
  • 2 large potatoes
  • 3 cups (half bag) frozen cauliflower

Directions

Preheat oven to 375. Dice potatoes to similar size as the cauliflower. Simmer potatoes and cauliflower for five to ten minutes depending on size of dice and flourets. Potatoes should be just tender. Drain and place in greased 8x8 casserole dish. Melt butter or margarine over medium heat. Mix in top five ingredients to form a rue. Stir well. Cook the rue a few minutes to avoid the raw flour taste in the final dish. Slowly add milk to form a thick creamy mixture. The consistency should be similar to pancake batter. Remove from heat, add cheese and mix till melted. Pour over cauliflower and potatoes. Optionally, you can top with bread crumbs but I skipped it. Bake 30 minutes.

Jenn also blogs about crafts, recipes, and raising kids on a budget at Frugal Front Porch.

Friday, January 1, 2010

Scrappy Scarf!

Kellie is a mom, wife, tree-hugger and Martha wanna be. She blogs regularly at Greenhab and the Green Phone Booth.


Call me obsessive (it's certainly been said before) but I keep every scrap of fabric down to the teeeeny tiny little pieces. I can't help myself - what if I need it one day!?

I had a bunch of little pieces left over from Christmas projects. For my mom, I made the softest cashmere scarf (that I was tempted to keep for myself). I got the idea from Betz White's book Sewing Green, in which she made a throw blanket from thrifted cashmere sweaters. You can see the blanket and some of her other projects here. (I have a total crafty crush on Betz because everything she does is simply brilliant and adorable.)

Anyway...back to the scarf! I lined the scarf for my mom with a super soft grey fabric and had just enough left over to make one more scarf for a girlfriend whose birthday is coming up. I chose to dress it up with a few scraps of an Asian print fabric that I love. Instead of giving you detailed instructions I have some cliff's notes since you can really make the scarf as long or as wide as you want it.

Here's what you'll need: some soft cloth for the main part of the cloth, some scraps for the accent pieces, anything else you'd like to use for accents.


The scarf I made is probably about 40 inches long by 7 inches wide. I say "probably" because I cut the grey fabric into two pieces that were 32" long each (one for the front of the scarf, one for the back). I then sliced each piece at random points to insert pieces of the scrap/accent fabric. After reassembling it, I just trimmed the front and back pieces so they were the same length. Because I tend to be all precise like that! ;)

Let's start with the reassembling part! After you sew your scrap pieces in, you'll flip it over and iron the seams inward, pin and sew a line across so that the front is both tidy and sturdy.


Do that at each point where you've added the scrap fabric.

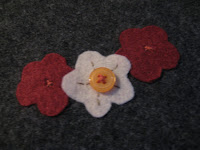
For this project I wanted to add some embellishment at the end of the scarf, so I used felt to make some flowers that look like the flowers in the scrap fabric. I used Heat'n'Bond to affix them to the fabric, then did some hand stitching to give them a little extra security. Looking back I wish I had put more on it, but time didn't really permit.


Now you're ready to assemble the front and back. You'll just lay one on top of the other, right sides together, and sew all sides, leaving a few inches open to turn. Turn it right side out, push out the corners, then top stitch all the way around.


I love the way it turned out - I hope the birthday girl likes it too!

Header designed by Crystal. Thanks!