Tuesday, June 30, 2009

Carnival #122

Welcome to the 122nd edition of the Make it from Scratch carnival. Before we get started, let me invite you to participate tomorrow in Firsts on the First. Every first of the month we share something new we have tried to make from scratch. We share the good, the bad, and the ugly. Tomorrow I am sharing something that turned out very well. Please share your attempts at new things. Simply post about it, or use a post from earlier in the month, and leave your link tomorrow.


Now, on to the carnival.


GOOD EATS!
Stephanie presents Recipe: Garden Vegetable Calzones posted at A High And Noble Calling.

Dora Renee' Wilkerson presents Y-2K Hippie: 06/26/09 posted at Y-2K Hippie.

Make it from Scratch presents Au Gratin Sweet Potatoes posted at Make It From Scratch.

Katie presents Katie's Simple Cabbage Soup with Secret Super Food posted at Kitchen Stewardship.

SWEET!
Joanna presents Chocolate Buttercream Frosting posted at Joanna @ OneKrustyMama.

Carrie presents Devil’s Food Cupcakes from Martha Stewart’s Cupcakes posted at It's Frugal Being Green.

Mama Bear presents Strawberry Rhubarb Crisp posted at Gotta Little Space.

Lisa Newton presents Savings With Sadie: Recipe Corner - Key Lime Pie - No Bake posted at Savings With Sadie


D-I-Y to Help the Cash Flow
Gin G. presents Sew Home Pursuits posted at Sense Scribe.

Bruno Vigneault presents Save on gas: convert your car to an hydrogen hybrid running on water! posted at Green Renewable Energy Technology.

Christopher X. Gerber presents Making Money with a Blog posted at Experiment: Gerbus.

Alvina Lopez presents Traveling Cheap When You’re a Student – Here’s How You Do It | MasterDegreeOnline posted at MasterDegreeOnline.


Thank you for joining us today. Next week the carnival will be hosted at Kitchen Stewardship. Submit your posts using the Blog Carnival form.

Monday, June 29, 2009

Mason Jar Peach Cobbler


I made this over the weekend for our local Heritage Days Festival. It was a huge hit and I'm sure it will be with your bunch too! I adapted this recipe from Paula Deen-she's my hero!!!

Ingredients
2 cans sliced peaches drained
1 cup sugar
1 1/2 cups self rising flour
1 tsp cinnamon
8 tbs butter
1/1/2 cups milk

Directions
Preheat oven to 350. Drop 3/4 tsp of butter in 12 half pint mason jars. Place jars in a large casserole or broiler pan to help keep them stable. Place pan of jars in oven to melt butter. Cut drained peaches in large chunks and set aside. Mix dry ingredients with milk till smooth. Spoon 1/3 cup batter into each jar. Evenly divide any left over batter among the jars till all the batter is used. Spoon 1/4 cup of peaches on top of batter. Bake jars 25 minutes or until to>ps are slightly brown. Dust with cinnamon sugar mixture is desired. Carefully screw lids and seals on immediately after removing from oven for self sealing jars.
Makes approximately 12 half pint jar servings.
Sealed items can be stored at room temperature or in the refrigerator. Jars can be kept for several days up to a week. Do not eat if item's color has changed or there are any visible signs of mold.


Tips and hints
Virtually anything can be baked and sealed in a jar. The trick is to fill the jar 1/3 of the way full for any rising breads or cakes to allow enough head room after baking. Quickly and carefully screw lids with seals onto the jars. As the sealed jar cools the lids will self seal. Remove the lids and seals to heat either in the microwave or oven. Serving food in a jar is perfect for picnics or family reunions.


Friday, June 26, 2009

Basic Canning Equipment

I originally posted this last year, but thought it would be helpful to post again for those who are new to preserving. For those of you who are new to preserving, feel free to ask any questions. I will do my best to answer. For those of you who are experienced canners, feel free to leave a comment about your favorite canning gadget, or canning tip.

Where I live a backyard garden is a common thing, but even here, I've noticed many new gardens go in this spring. Many existing gardens have also been expanded. Pressed by rising fuel prices and the rising food prices that are following, people are stretching their grocery dollars by raising some of their own food.

My garden is just starting to produce, and soon it will be time to break out the canning equipment to put away some of that harvest for the winter. I know many of you have expressed an interest in canning. I am no expert. The real experts are the folks at the USDA, but I am happy to try and help. Let's start with the basics.

There are three very basic items you need to begin canning. You need jars with sealing lids, a large pot for processing, and canning tables that tell you how long to process the jars.

Jars with Sealing Lids
You can find jars in a variety of sizes. The most common used are quart and pint jars. I find quart jars to be the most useful for my large family. I use pint jars mostly for hot peppers and pickles, though it is nice to have some pints of tomato sauce too.

Jars also come in wide mouth or regular. In my opinion, wide mouth are much easier to work with. They also are easier to clean, but they are more expensive.

Some people use recycled jars from spaghetti sauce or other items they have purchased at the store. I personally do not do this, and it is not recommended by the experts. I believe the logic behind this is that Mason jars are made to last the stresses of canning repeatedly. Jars used in the food industry may or may not be made as strong. Yet, I know people do can with them.

The most common type of lid is actually a two part lid. It is a lid with a ring. You have to buy new lids every year, but the rings can be used over and over. They are easy to use. There are other types of sealing systems using reusable rubber rings. I've never canned with those before, so I can't offer too much information on those.

Processing Pot
When you are canning there are two ways to process the jars. You can simply cover them with boiling water and boil for the recommended amount of time. The other way is to use a pressure canner. It is not recommended that low acid foods, like beans, be processed using the boiling water method. All foods can be canned in a pressure canner. I use both methods.

When canning with boiling water any heavy pot that is large enough to fill with enough water to cover your jars can be used. A water bath canner with a rack is much more convenient to use. They really aren't very expensive. I think a canner is a worthwhile purchase if you are planning to do a lot of canning that can be done without pressure canning.

Canning Tables
You need a resource to consult for how long to process your jars. If you buy a new canner, chances are there will be instructions with timing tables included. One of my older cookbooks also has tables. There are whole cookbooks devoted to canning. The most famous is probably the Ball Blue Book. Though a canning cookbook isn't necessary, it is nice to have as a resource. Besides basic instruction and time tables, it gives you recipes for different items. It can help when you are at a loss for what to do with the excess your garden is producing. Of course all canning tables are created based on the guidelines put out by the USDA. Their advice is available for free online.

These are the bare basics of equipment you need to begin canning. There are lots of tools and gadgets designed to make things easier. Before you run out and buy any equipment and gadgets, check around for used supplies. There are lots of people with shelves and boxes full of jars that they don't ever plan to use. Let family member know you are looking for canning equipment. Check on Cragislist. Ask on Freecycle. Look at yard sales. You may find all you need for free or a fraction of the cost of new.

I hope that was helpful for those who are new to canning. If you have any questions, I'd be happy to help if I can.

Thursday, June 25, 2009

Salmon Patties - Fish for a Tight Budget

I am not a menu planner. Instead I rely on a long list of recipes that my family enjoys, and a pantry that is well stocked with the ingredients to make those meals. Most of our meals start with simple, economical ingredients. My cooking may seem to some a bit old fashioned. In fact, my favorite cookbook was published in 1965, but my family is not complaining, and neither is my pocket book.


One thing that can be difficult to incorporate into meals on a budget is fish or seafood. We all know that fish is good for us. While I'd love to serve my family a nice grilled fillet of salmon on a regular basis, it simply is not in our budget. The much cheaper option is to use canned salmon.

For many years I avoided canned salmon. The thought of picking out all the bones was simply repulsive to me. Then I started noticing that most recipes did not say anything about picking the bones out. In fact, many actually stated that you should leave the bones in.

The canning process makes the bones very soft. The bones give your dish and extra nutritional boost by adding calcium to your meal. I decided to meet the bones in the middle. I pick out the larger bones, but don't bother trying to get every bone out. It only takes a minute to get the big bones out, and honestly, those remaining bones do not change the texture of the dish.

Most often I use canned salmon for salmon patties. Making salmon patties (which can be formed into a loaf also) is like making a meatloaf. You can use a wide variety of ingredients, whatever you have on hand, to mix up a delicious and economical meal for the family. Below is a basic version to start with.

Basic Salmon Patties

An easy and economical dish for the family.

See Basic Salmon Patties on Key Ingredient.


A couple of hints to be sure your patties make it out of the pan as patties, and not as crumbles:
Make sure your pan is good and hot before you put the patties in.
Do not flip the patties until the bottom is done. You will be able to see the brown on the bottom edges.

Tuesday, June 23, 2009

Carnival #121

This week the carnival can be found at It's Frugal Being Green. It is another good one this week. Lots of delicious recipe and frugal ideas and crafts. There are so many talented people who participate in this carnival.


Some that I found particularly interesting include:

Cookie, cream cheese, and berries...what's not to love?

My beets are ready. My carrots almost are. Can't wait to try this!

Can you tell I'm all about recipes to use what is in season right now?

Be sure to check the entrie carnival, and don't forget to thank our hostess.

Next week the carnival is coming home. I can't wait to get my sneak peak at the submissions. Hope to see you participating!

Monday, June 22, 2009

Au Gratin Sweet Potatoes

Sweet potatoes is a staple in just about every southern kitchen. There are so many ways to prepare a sweet potato. Baked like a russet, candied in brown sugar, or even topped with marshmallows casserole style. We love them no matter how they're prepared. Today I'll share my newest recipe using this colorful and naturally sweet vegetable-Au Gratin style. I hope you love them as much as we did. Sorry there's no picture but the family just couldn't wait long enough for me to take a photo of the final product! They were THAT delicious!

Ingredients
3 sweet potatoes
8 ounces Velveeta Cheese
Heavy Cream

Directions
Preheat oven to 425. Peel and chop the sweet potatoes into approximately 2 inch chunks. Toss in a large pot with enough cold water to cover the potatoes and bring to boil. Cook approximately 15 minutes or until the potatoes are just tender. While potatoes are cooking, melt cheese and mix in enough heavy cream until you get a smooth cheese sauce. We like our taters really cheesy but you can adjust the amount of cheese and cream to your taste. Drain the potatoes, transfer them to a casserole dish and pour the cheese sauce over it all. Bake till cheese starts to brown. Serves 4 generous portions

Tips, Tricks, & Hints
No heavy cream? No problem, milk works just as well.
Add a tablespoon of sour cream for a rich flavor kick.
Change up the flavor by mixing different cheeses: cheddar, cream cheese, mozzarella, Parmesan, etc.
Cheese sauce too thin? Add a cornstarch/cold water mixture to help thicken it up.

Friday, June 19, 2009

Blackberry Freezer Jam

My seven year old daughter is becoming the family berry picker. Everyday she goes out to the patch of black raspberries to check and pick. So far, she is only getting a couple cups at a time, but soon the blackberries will be ripe and picking will become a family job.


I'm not complaining. I enjoy going out to pick. Often I will get up before the kids and sneak out to the berry batches to pick in the early morning peace and quiet. It is good for my soul. And the resulting berries are good for my taste buds.

One of my favorite ways to preserve that fresh berry goodness is with freezer jam. It is faster to prepare, and keeps more of the fresh taste than cooked jam. It does set softer, and of course requires space in the freezer. The recipe is in the Sure-Jell box.

3 pints blackberries (6 cups)
5 1/4 C sugar
1 box Sure-Jell

Mash berries with a potato masher one cup at a time. Add sugar to crushed fruit. Stir and allow to sit for ten minutes. Put pectin and 3/4 C water into a sauce pan. Bring to a boil stirring constantly. Boil for one minute. Add mixture to berries and stir for about three minutes until sugar is dissolved. Pour into containers. Allow to sit at room temperature for 24 hours. Keeps in the refrigerator for about three weeks or up to a year in the freezer.

I don't have many freezer boxes. I freeze most things in bags. Trust me, bags are not the way to freeze freezer jam. What a mess! Instead I used recycled food containers like cottage cheese containers. Works wonderfully. Just be sure to label your container!

Thursday, June 18, 2009

So Unappreciated

Do you ever wonder why some vegetables get all the glory, and some are so simply pushed aside? Some, like the tomato, have earned their spots of honor through their versatility and good taste. But how do others, like the green bean, earn such priority on our palates? I do love green beans, especially fresh from the garden, but why are they so much more popular than say something like the beet?


Beets are extremely easy to grow, and to harvest. They have a beautiful color and are full of nutritious goodness. Why are they so unappreciated?

The first beets of the season have been harvested from our garden. I am excited to cook them up and maybe try a few new recipes, but generally we pickle them or prepare them in a simple manner to be eaten hot. Beets are very easy to prepare.

First, trim off the greens leaving an inch or two of the stem. Don't throw the greens out. They can be cooked and eaten. Just prepare them as you would cooked spinach or other greens.

To prepare the root, leave it in tact. Scrub the beets clean. Put them in a pot and cover with water.

Bring to a boil and boil for about 40 minutes, (depending on their size) until the beets are soft enough to pierce easily with a fork.

Rinse the beets in cold water and allow them to cool until you can handle them. The skins will slip off easily, and the remaining stem and root can be trimmed. Now your very red beets are ready to be sliced and served the way you like. Normally I just add a little butter and a little salt.

Show beets a little love. Head to the grocery or the farmers market and pick up a few fresh beets and give them a try. If you garden, beets do well as a fall crop, planted in late summer. You can plant them after your early crops are done.

What is your favorite under appreciated vegetable?

Tuesday, June 16, 2009

Carnival #120

The carnival is up at 11th Heaven's Homemaking Haven, and what a great one. The variety this week is incredible. As always, Mommy2my9 did a fantastic job presenting the carnival!


Here are few that I found particularly interesting:

A couple hours and $13 to transform the playroom. It looks beautiful. I'm curious how it will hold up though.

I enjoyed Mixed Media Artist's fabric painting last week also. This week's creation is just as lovely.

This recipe is like my grandmother's recipe that we layer with bananas and whipped cream. When I mention date pudding, people often look at me like I'm crazy. It is good to know someone on the other side of the globe enjoys this dessert also.

I hope you enjoy the carnival. Hope to see your post included in next week's carnival.

Monday, June 15, 2009

Fun Father's Day Ideas

Don't forget Father's Day is Sunday, June 21st. If you're tight on time, money, or both, here's a few fun gift ideas that won't wipe out your checking account!

Water Fountain-Hubby has wanted an indoor water fountain for months so I plan to make him one. There's a gorgeous over-sized ceramic cowboy boot at our local greenhouse I'm dying to get my hands on. (The boot pot may be a bit pricey for my budget but, I can still do this inexpensively with any decorative container so cross your fingers I find something awesome at a garage sale this week!) I'll thread my water pump's electric cord through the drainage hole. Then cover it with either a rock, glass, or part of a broken pot and seal with water proof epoxy found at most hardware or automotive stores. Finish installing the small water pump per it's directions and add some river rocks to hold the pump in place and POOF...instant water fountain! Have it placed on some large tiles or decorative saucer with cacti, sand and rocks for a Southwestern touch!

"Dad Rocks" paperweight
-Clean, dry and paint a large river rock dad's favorite color. Once the paint is dry, write in permanent marker "DAD ROCKS" and add any other personal touches, glitter paint, stickers, etc. Once all the markers and paint is dry, add several clear coats of poly acrylic to ensure durability. Make sure the rock has one side almost flat to make writing easier.

Puzzle Picture Frame/Magnet-Take pieces from incomplete puzzles and paint the backs whatever color you think dad will like the best and allow to dry. In the meantime, cut a piece of cardboard (from the puzzle or cereal box) slightly bigger than the photo you intend to frame. Center your photo and mount either with tape or craft glue. Once all the glue and paint is dry, start gluing the puzzle pieces in an overlapping fashion around your photo till all sides are covered. Glue a magnet to the back for a magnetic frame.

Chef Dad-Make father/daughter or father/son matching chef hats with the free pattern.

Stitched Poetry-Write a poem on fabric with fabric chalk or washable marker. Satin stitch over the writing with yarn, wrap around a piece of cardboard for extra stability and frame in a reclaimed picture frame.

Tie the Tie-Got dad a new tie for his big day? Show him this video series to learn five different tie knots he can use on his new accessory. While your there, link him up to the area on how to properly care for his ties to ensure they always look their best.

Dad's Cookbook-Make dad his very own cookbook with a simple binder and some of his favorite grill recipes. Insert a cover with the kid's drawing of dad grilling. Short on time or don't have many recipes to put in the book? No problem, search the internet for some grill recipes or sign up for The Art of Manliness and get their FREE 148 page Man Cookbook. (I've got it and love. love. love it!) Every daily feed has a link to the free ebook so you can print and bind it in no time flat!

Teach Dad-Last year Popular Mechanics published the 100 Skills Every Man Should Know article on their webpage. Either print the list for dad and add to his card for a fun reminder of skills not yet learned OR pick a couple of fun things, find a few tutorials on the web and hook dad up with a fun lesson from you and the kids. While you're there, be sure to hit their list of Father's Day DIY list for even more inspiration.

I'd love to hear any of your fun Father's Day Gift ideas...just in case my water fountain idea doesn't pan out! ;)

Read my other craft ideas, recipes, and money saving tips at the Frugal Front Porch.

Friday, June 12, 2009

Why Thank You!

Make it from Scratch was recently recognized as one of the Top 50 Frugality Blogs that will Help Save You Money. We are listed at number 20 under the category of Frugal Tips, Tricks, and Bargain Hunting. Frugal Dad has put together a wonderful list. Thanks to him for including us. Be sure to check it out.


Looking for theme days and carnivals to participate in? The House that Love Built has put together a huge list of daily themes. Make it from Scratch is appropriately listed under the Tuesday theme days. Thank you.

And one more thing. Alicia from whooga.com is offering Make it from Scratch readers a $30 coupon to use at their site. Use code MAKEITFROM. Their sheepskin boots look fabulous!

Thank you for being a Make it from Scratch reader. Have a great weekend!

Thursday, June 11, 2009

Berry Dumplings

This week we found the first ripe black raspberries. Thus begins the berry season here! Berries grow wild all over the place here. We didn't plant them. I don't tend them. We just simply enjoy the fruit that they produce. Maybe that is why I love them so much.


Our season starts with black raspberries (pictured on the right.) Soon there will be red raspberries (on the left) and by the first week of July we should be in full berry season when the blackberries are at their peak.

In this family, we all have our opinion about which berry is the best, but in recipes they really are interchangeable. They can also be mixed. We make jams, cobblers, a drink called shrub, vinegar, syrup, and pies. Of course many berries are simply consumed fresh, some are sold, and some are frozen for later use.

There are so many delicious ways to enjoy berries. Below is a recipe for Blackberry Dumplings. You can also use raspberries.

Blackberry Dumplings

A quick way to enjoy berries.

See Blackberry Dumplings on Key Ingredient.

Wednesday, June 10, 2009

Carnival #119

My apologies for not getting this up yesterday. It was a crazy day.


This week the carnival is hosted by Mama Bear at Gotta Little Space. And what a wonderful selection there is this week! Here are a few that I really enjoyed.

A great tutorial for making a sturdy bag from something that would otherwise end up in the trash.

My kids love to paint. I love that I can send them outside to paint this time of year. This recipe for do it yourself finger paint looks very simple and fun!

It can be challenging finding crafts for boys. This is a great idea.

I hope you enjoy the carnival this week! Here are some other carnivals that may be of interest.


Monday, June 8, 2009

Hand Appliqued T Shirts


I apologize for the delay in my posting today. We've been out of town ALL DAY! Needless to say, I'm glad to be back home. Now it's back to business.

Appliqued T Shirts are easier to make than you might think. Here's a list of items you'll need to get started:
T shirt
Coordinating fabric*
Embroidery thread & needle
Image for t shirt**
Freezer paper
Heat n Bond Fusible Interfacing
Iron
Scissors or Pinking Shears
Pencil
Embroidery hoop (optional)
Fabric paint (optional)

*This is a great way to use outgrown, stained, ripped, or otherwise unworn clothing.
**If you have some artistic talent, you can sketch your own image like I did but you can get great applique images from coloring books too. I suggest starting with a simple image until you get comfortable with the process.
  1. Cut down a section of coordinating fabric to a size slightly larger than your image.
  2. Trace your image onto a section of freezer paper. If you plan to applique multiple fabrics then a freezer paper image for each fabric is necessary.
  3. Using medium heat iron setting, iron the freezer paper to the RIGHT side of your fabric.
  4. Cut down a section of Heat N Bond Fusible Interfacing and iron to WRONG side of fabric according to the package directions.
  5. Cut out your image from your interfacing, fabric, freezer paper sandwich and gently peel away freezer paper.
  6. Arrange your image on your t shirt RIGHT sides up.
  7. Set aside all pieces except the bottom (or base image) of your applique cut out.
  8. Iron bottom image to the t shirt per directions.
  9. Stitch around edge with embroidery thread.
  10. Add the next image layer and repeat steps 8 and 9.
An embroidery hoop will help hold the t shirt taught if you have trouble stitching around your applique. Another alternative is to run a bead of fabric paint around the edge of your applique.


If you like this idea, find other craft ideas, recipes, and home keeping tips at Frugal Front Porch.

Friday, June 5, 2009

One Lovely Blog

Thank you to Thrifty Mom and to Tami, both of whom awarded Make it from Scratch with the One Lovely Blog Award.  We certainly appreciate the recognition ladies.  


And while we are talking about lovely blogs, let me point you in the direction of some other lovely blogs that are hosting carnivals of interest this week. 


Would you like to guest post here at Make it from Scratch? We are looking for guest posts to be featured here on Fridays. Please email makeitfromscratch at yahoo.com.


Thursday, June 4, 2009

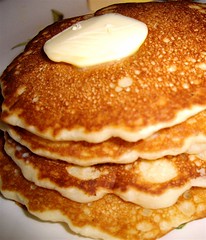
My Favorite Pancakes

Don't you just love when something so easy and so economical is one of your family's favorite meals? 


Pancakes are always one of our favorite meals whether it be for breakfast, lunch or dinner. The recipe below is an easy and quick one that produces light and fluffy pancakes. Don't worry if you don't have buttermilk on hand. A quick and easy substitute is to add 1 TB of lemon juice or vinegar to a cup of milk and let it sit for a few minutes. This recipe makes a small batch. We triple it for my family of six. 

Normally, we just serve our pancakes with maple syrup, but they are fantastic topped with fruit, or with a few blueberries added to the cakes on the griddle. YUMMY!


Buttermilk Pancakes

An easy family favorite.

See Buttermilk Pancakes on Key Ingredient.


Photo credit: taminsea

Tuesday, June 2, 2009

Carnival #118

Welcome to the Make it from Scratch Carnival. There are many wonderful submissions this week. So, let's dig in! 

How Sweet It Is

Dawn C. is building her confidence in the kitchen. She is beginning with little steps like making Funnel Cake Mix. Way to Go!

Liss is making Lolly Gobble Bliss Bombs! Don't know what that is? Go find out. It looks wonderfully yummy, but she warns that it is also a tad addictive. 

Rani shares the recipe for  Banana Split Dessert posted at Christ's Bridge.

Icing should be a very simple thing shouldn't it? I still have a hard time getting it to come out right. Perhaps I need to try the  Best White Icing Ever that timbuck2mom is making. 

What can't Marsha make in a bread machine? This week it is Banana Jam in the Bread Machine.

I think I have some elderberry at the end of my driveway. They aren't blooming yet, but when they do I will be making Fried Elderberry Blossoms like The Austerity Kitchen.
 
Simply Delish!

SimplyForties always has such wonderful recipes.  Crispy Catfish Curry is no exception. It sounds wonderful!

J Knight presents The Amazing Soup Diet - Better Than Basic Soup.  This soup is full of healthy goodness. 

Do you have old bread that needs used? vh uses hers to create something delish for dinner; Panzanella: Use-it-up Italian comfort food .

Howling Duck Ranch is learning to make Fresh mozzarella cheese. 

jim presents Homemade Pork & Shrimp Dumplings.  Oh how I love these when we go out to Chinese! 

Annette Berlin has a quick and simple dish for us,  Crustless Broccoli and Cauliflower Quiche. 

Oh So Practical!
RecycleCindy has another wonderful creation. a Cute Scrubbie and Dishcloth Kitchen Set. 

Make it from Scratch presents When the bee stings. You'll find tips to avoid bee stings, and a simple remedy to relieve the pain if you do get stung.

Mikkal Travvis presents How To Survive A Flu Pandemic.The title may seem a little over dramatic, but there are some good tips in here for fighting the flu with natural remedies.

Deb Thompson has a fun and practical project; DIY: Lip Balm.


Pretties
Mama Bear's Tile Pendant Necklace is simply beautiful.

Cindi Albright presents Don't Throw It Away!!!! And from the broken pieces she creates beautiful things. 

Joanna is making pretty things for her daughters. Check it out in I Caught A Bug.

Thank you for joining us this week for the carnival. Join the fun by submitting your posts via Blog Carnival for next week's edition hosted by Mama Bear at I've Got a Little Space to Fill

If you like this carnival, we appreciate your links back and your thumbs up on Stumble or other social bookmarks. 


Monday, June 1, 2009

Homemade Toffee

This is the EASIEST & YUMMIEST candy I have ever made. It's so darn yummy I couldn't wait to eat! I wanted to decorate it with drizzled almond bark and crushed peppermint but it was gone before I got the chance. Maybe next time.


Ingredients

1/2 cup butter
1/2 cup granulated sugar
1 Hershey chocolate bar - optional

Directions
Line your pan with wax or parchment paper so the bottom and sides are covered. Melt butter in saucepan over medium heat. Add sugar and stir till dissolved. Allow mixture to cook, stirring occasionally till bubbly. There came a time when I thought it would not caramelize but it will-I promise! Once mixture has caramelized, stir well to ensure all ingredients are well incorporated. There was also a moment when I thought the butter and caramelized sugar wouldn't come together-just keep stirring! Pour into a pan line with wax paper and allow to cool. Heat Hershey bar till melted. Spread over cooled toffee and allow to set. Once candy is completely cooled and set, pull the toffee out by grabbing the excess wax paper. Lightly "drop" it onto the counter allowing the candy to break into pieces. Store in an airtight container. If it lasts that long!


Jenn's Tip: Don't worry about exact measurements. Toffee is a classic candy originally made by rural homemakers who needed a quick and tasty treat for the kids. It was a popular candy because it uses staple ingredients already in the pantry. This is a very tolerant recipe but equal parts of butter and sugar result in a smoother texture.

Find other recipes, crafts and homemaking tips at Frugal Front Porch.

Firsts on the First - Making a Purse from Jean Legs

This week I broke out the sewing machine, a rare and sometimes frustrating event in this house. The first project on the docket was to cut off and hem some old jeans for my seven year old to wear around the house. With that task accomplished, I was left with six jean legs. Feeling a little brave, I determined to create something with them. 


A tutorial for a Jean Leg Purse looked like the easiest project. Lydia wanted to help me, and wanted to create the purse for her cousin whose birthday is this week. We got to work. 

We started by cutting the leg to the length we thought would work best. Then Lydia cut the seam off of the leg. 
 

Next we sewed the bottom of the purse together. Then we clipped up from the bottom to the seam about every 1/4 inch to create a fringe on the bottom of the purse. A fringe was also created in the same way at the top of the purse. 


From the extra piece of the leg created when we cut the purse to size, we cut nine strips about 3/4 of an inch wide. 

These were sewn together in threes to create three longer strips. The three long strips were then braided together, and attached to the top of the purse to create the purse strap. 


Next came the decorative part. We used a different material to cut out hearts and a monogram. These were then sewn onto the outside of the bag. This was the most difficult part of the project I thought.


And the finished product. The outside pocket was already part of the jeans. I thought it would be a nice place for a cell phone. 


Overall I am happy with the results. I am thrilled that I actually sewed something. I still have five jean legs left. Any ideas?


Did you take the challenge this month? Did you try something new? Share it with us by adding your post url to the Mr. Linky below. Links back to Firsts on the First are appreciated!


Header designed by Crystal. Thanks!